Warframe Beginner Guide
Everything a new Tenno needs, from your first quest to how damage is actually calculated. 21 sections, in order, on one page.
Verified against Update 43: Jade Shadows: Constellations, released 2026-06-17.
Start Here
Your first hour, the starter Warframes, and how to move.
Warframe is a cooperative action game in which you play a Tenno, controlling a Warframe: a biomechanical suit with four abilities and three weapon slots. Progress means unlocking the Star Chart, collecting and levelling gear, and improving that gear with Mods.
It is a large game with very little hand holding after the first hour. The single most useful thing to know starting out is that almost nothing is permanent. Your first Warframe is not a class choice, weapons are disposable, and everything can be earned without spending money.
Your First Three Quests
- 1.Awakening. The tutorial. Teaches movement, hacking and a boss fight, and is where you pick your first Warframe and weapons.
- 2.Vor's Prize. Opens up Earth, the Foundry and the basics of crafting.
- 3.The Teacher. Introduces Mods and how to install them.
Choosing a Starter Warframe
Awakening offers three. All are good, all can be re-acquired later, and none of them locks you out of anything:
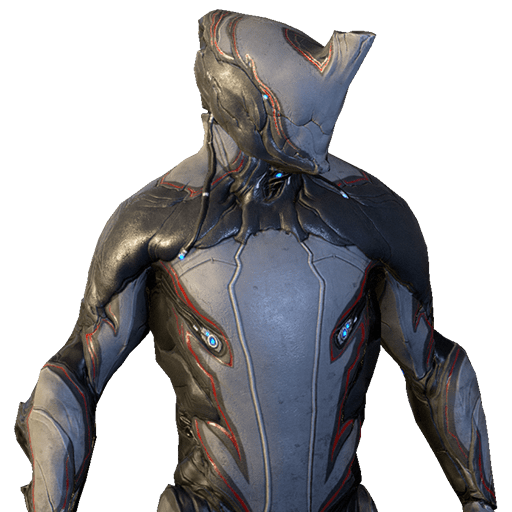
The easiest of the three to learn with. Exalted Blade gives him a reliable damage ability that does not depend on positioning, and Radial Blind is a genuine panic button.

Strongest of the three against Corpus, whose Shields she removes outright. Magnetize also groups enemies, which makes her better in a squad than her damage numbers suggest.
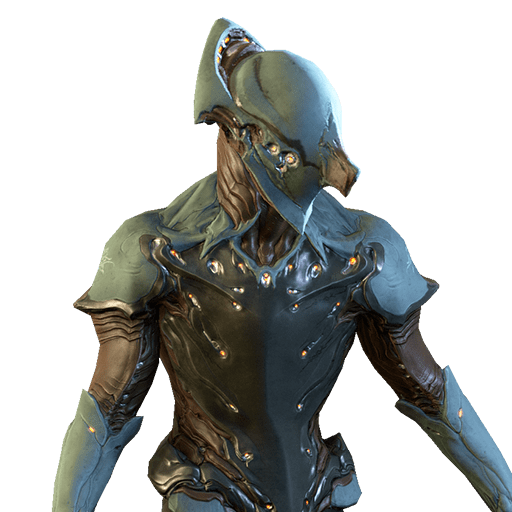
The most flexible pick. Speed helps the whole squad move, and Electric Shield is one of the few early abilities that meaningfully protects other players.
Movement
Warframe is not balanced around walking. Bullet Jump, performed by crouching then jumping, is the primary way to travel, and chaining it with a roll or an aim glide is several times faster than sprinting.
- ◆Crouch then jump to Bullet Jump. Aim it in any direction, including straight up.
- ◆Roll immediately on landing to keep the momentum.
- ◆Aim glide by holding aim while airborne, which slows your fall and steadies your shot.
- ◆Wall latch and wall run to reach vents and high ledges.
Q1. Which three Warframes can you choose from when you start the game?
Q2. What is the fastest way to move around a tileset?
The Star Chart & Quests
Junctions, planet order, and the quests worth doing in order.
The Star Chart is the map of the solar system. Planets are connected by Junctions, and each Junction lists a handful of tasks plus a Specter fight. Clearing it opens the next planet. You do not need to complete every node on a planet to move on.
The Main Path
Thirteen planets, in the order the Junctions open them. Phobos, Ceres, Europa and Lua branch off and are worth clearing, but are not on the critical path.
Node counts and factions come from the game's own Star Chart data. The damage types are the two that faction takes x1.5 from.
- Earth21 nodes · mostly Grineer
Vor's Prize, your first Mods, and the Venus Junction.
Bring Impact
 CorrosiveOptional from here: Lua
 - Venus24 nodes · mostly Corpus
The Foundry, Fortuna, and Rhino from the Jackal.
Bring Puncture
 Magnetic
 - Mercury15 nodes · mostly Grineer
Once Awake, and Nightwave becomes worth tracking.
BringImpactCorrosive - Mars22 nodes · mostly Grineer
Void Relics, Maroo's Bazaar, and Trading at Mastery Rank 2.
BringImpactCorrosiveOptional from here: Phobos, Ceres - Deimos17 nodes · mostly Infested
Heart of Deimos, the Cambion Drift, and Orokin Vaults.
Bring Slash
Slash Heat
Heat - Jupiter20 nodes · mostly Corpus
Archwing, Nightmare missions, and Cephalon Simaris.
BringPunctureMagneticOptional from here: Europa - Saturn30 nodes · mostly Grineer
The first real Armor wall. Bring Corrosive or Heat.
BringImpactCorrosive - Uranus26 nodes · mostly Grineer
Natah begins. Duviri unlocks here, but hold off on it.
BringImpactCorrosive - Neptune22 nodes · mostly Corpus
The Second Dream. The turning point of the story.
BringPunctureMagnetic - Pluto22 nodes · mostly Corpus
The War Within, Arbitrations, and Rivens.
BringPunctureMagnetic - Eris29 nodes · mostly Infested
Rising Tide and Railjack.
BringSlashHeat - Sedna28 nodes · mostly Grineer
Chains of Harrow.
BringImpactCorrosive - Void14 nodes · mostly Orokin
Apostasy Prologue and The Sacrifice.
BringPuncture Viral
Viral
Quests Worth Doing, in Order
- 1.Once Awake (Mercury). Short, and introduces the Infested.
- 2.Heart of Deimos (Deimos). Opens the Cambion Drift, an open world area with bounties and its own progression.
- 3.The Archwing quest (Mars). Required for the Saturn Junction.
- 4.Natah (Uranus). Begins the second story arc. Triggered by scanning an Oculyst.
- 5.The Second Dream (Neptune). The game's major turning point. Avoid spoilers for this one.
- 6.The War Within (Pluto), then Chains of Harrow (Sedna), then The Sacrifice (Void).
Progression Checklist
What to actually do on each planet, taken from the wiki's New Player Guide. These tick and are remembered, so you can work through them across sessions.
Ticks are saved in this browser, so you can come back to this. Items marked optional are worth doing but will not hold up your progress.
PrologueThe three tutorial quests.0 / 3
EarthYour first Mods and your first Companion.0 / 11
VenusThe Foundry, and Rhino.0 / 5
MercuryNightwave, and the Codex.0 / 6
MarsVoid Relics, Ayatan Sculptures, and Trading.0 / 1
DeimosThe Cambion Drift, and Corrupted Mods.0 / 4
JupiterArchwing, and the Codex Scanner.0 / 6
SaturnThe first real Armor wall.0 / 5
UranusNatah, and the start of the second arc.0 / 5
NeptuneThe Second Dream. The turning point.0 / 5
PlutoThe War Within, Rivens, and Focus.0 / 7
ErisRailjack.0 / 5
SednaChains of Harrow.0 / 2
VoidThe end of the new player guide.0 / 3
The Circuit
Once Duviri is available, The Circuit is unusually generous for content you can reach that early. Its weekly rotation awards whole Warframe parts including blueprints, some Augment mods, and occasional Aura mods. For a new player it is often the fastest route to a second and third Warframe.
Q1. What unlocks the next planet on the Star Chart?
Q2. Which quest should you hold off on until after The Second Dream?
Q3. Why is The Circuit worth running as a newer player?
Mastery Rank
How Mastery works and what each rank unlocks.
Mastery Rank measures how much distinct gear you have levelled. It gates some weapons, some Mods and a handful of systems, and it raises several daily caps. It is earned by ranking up equipment you have not levelled before, so selling a weapon after maxing it keeps the Mastery.
Where Mastery Points Come From
| Weapons | 100 per rank, 3,000 at rank 30 |
| Warframes and Companions | 200 per rank, 6,000 at rank 30 |
| Junctions | 1,000 each, on first completion |
| Intrinsics | 1,500 per rank |
| Star Chart nodes | Awarded on first clear |
The requirement for each rank grows quickly:
| Ranks 1 to 30 | 2,500 x Rank squared | Rank 10 needs 250,000 |
| Legendary ranks | 2,250,000 + (147,500 x Legendary rank) | Beyond rank 30 |
Early Unlocks Worth Aiming For
| Mastery Rank 2 | Trading | Also requires two factor authentication on your account |
| Mastery Rank 3 | Syndicate pledging, Mirror Defense, The Waverider quest |
Daily Caps
| Syndicate Standing | 16,000 at Mastery Rank 0, plus 500 per rank |
| Focus from Lenses | 250,000 at Mastery Rank 0, plus 5,000 per rank |
| Trades per day | Equal to your Mastery Rank |
The Tests
- ◆Each rank requires passing a test, played solo.
- ◆Passing puts the next test behind a 23 hour cooldown.
- ◆Failing carries no cooldown as of Update 38, so you can retry immediately.
- ◆Every test can be practised for free at Cephalon Simaris in any relay, as many times as you like.
Q1. How many Mastery Points does ranking a weapon from 0 to 30 give?
Q2. What is the cooldown after passing a Mastery Rank test?
Q3. What does Mastery Rank 2 unlock?
Foundry & Currencies
Credits, Platinum, Endo, Ducats, and what to spend them on.
Almost everything in Warframe is built in the Foundry from a blueprint plus resources, and then waits on a real time build timer. Warframe components take 12 hours each and the finished Warframe takes 72, so starting a build before you log off is a habit worth forming early.
The Currencies
| Credits | The general currency. Blueprints, Foundry costs, Mod upgrades and Trading fees. |
| Platinum | The premium currency. Tradeable between players, so it can be earned without spending money. |
| Endo | Upgrades Mods. Comes from Ayatan Sculptures, endless missions and Mod dissolution. |
| Orokin Ducats | Earned by selling Prime parts at a relay. Spent only with Baro Ki'Teer. |
| Syndicate Standing | Faction reputation. Buys Augment mods, Arcanes and blueprints. |
Spending Your First 50 Platinum
- ◆Warframe slots and weapon slots. Always the right answer first.
- ◆Do not rush Foundry timers. Rushing converts Platinum into a few hours of waiting.
- ◆Do not buy Orokin Reactors or Catalysts yet. Nightwave gives them away regularly.
- ◆Do not buy Warframes outright. Most are more satisfying, and cheaper, to farm.
Nightwave
Nightwave is a free seasonal progression track with daily and weekly tasks. Its rewards include Orokin Reactors and Catalysts, Forma, Umbra Forma, Aura mods and Nitain Extract, several of which have no other reliable source. For a new player it is the highest value repeatable content in the game.
Earning Platinum Without Paying
- ◆Sell duplicate Prime parts from Void Relics. This is the standard method.
- ◆Sell spare Rivens and rare Mods once you reach Mastery Rank 2 and can Trade.
- ◆Ayatan Sculptures can be sold to other players, or handed to Maroo for Endo.
Q1. What is the best use of the 50 Platinum a new account starts with?
Q2. What is Endo used for?
Mods & Your Arsenal
Where Mods come from, Void Relics, and Forma.
Mods are where nearly all of your power comes from. An unmodded weapon at Mastery Rank 20 is weaker than a well modded starter weapon. This section covers where they come from; the Damage Mechanics group covers how they combine.
Where Mods Come From
| Enemy drops | The bulk of common and uncommon Mods |
| Transmutation | Four unwanted Mods combined into one random Mod |
| Nightmare Missions | Dual stat Mods such as Drifting Contact and Shred |
| Orokin Vaults on Deimos | Corrupted Mods, which carry a large bonus and a real penalty |
| Syndicates | Augment mods that change how a specific ability behaves |
| Bounties and Arbitrations | Many of the strongest Mods in the game |
Upgrading Mods
Ranking a Mod up costs Endo and Credits, and raises both its effect and its drain. A maxed Serration is +165% damage at 14 drain, so a fully upgraded Mod is not automatically the right choice while your capacity is tight.
Void Relics and Prime Gear
Void Relics are the only source of Prime equipment. To open one, run a Void Fissure mission with the Relic equipped, collect 10 Reactant from the corrupted enemies, and choose a reward at the end. In a squad you see all four rewards and may pick any of them, which makes public Fissure runs meaningfully better than solo.
- ◆Duplicate Prime parts can be sold at any relay for Orokin Ducats, then spent with Baro Ki'Teer.
- ◆Prime parts are the standard thing new players trade for Platinum.
- ◆Forma blueprints are a common Relic reward, which is where your early Forma will come from.
- ◆Aya is the currency that buys Relics for Primes no longer in rotation. Our Aya farming guide covers where it drops.
Orokin Reactors, Catalysts and Forma
| Orokin Reactor | Doubles a Warframe's Mod Capacity to 60 | Often called a potato |
| Orokin Catalyst | Doubles a weapon's Mod Capacity to 60 | Also a potato |
| Forma | Adds or changes a slot's polarity, and resets the item to rank 0 | Does not add capacity |
A Worked Example
All of the above is easier to see on a real build than to read in the abstract. This is a general purpose early game primary template, using Mods you can realistically have in your first few hours:
Notice the shape rather than the exact Mods. Serration is the base damage, Split Chamber the multishot, Vital Sense and Critical Delay the critical stats, and Speed Trigger the fire rate. Those are five different categories, which is why they multiply with each other instead of adding into one bracket. That rule is the subject of How Mods Scale Damage.
The three elemental Mods are the interesting part. Malignant Force is Toxin and Rime Rounds is Cold, and in that slot order they combine into Viral, which leaves the Heat from Thermite Rounds standing on its own. That is the Viral and Heat pairing, assembled out of Mods a new player can realistically own.
Q1. What is the only way to obtain Prime equipment?
Q2. What does using a Forma on a piece of equipment do?
Clans & Trading
The Dojo, research, and how Trading works.
A Clan gives you a Dojo, and the Dojo's research labs hold a large set of blueprints with no other source. Joining one early is among the best things a new player can do.
What a Clan Gives You
- ◆Research labs covering entire weapon lines, including the Tenno, Energy, Chemical, Bio and Orokin labs.
- ◆Dragon Keys from the Orokin Lab, needed to open the Orokin Vaults on Deimos for Corrupted Mods.
- ◆A trading post, and people to trade with.
- ◆Decorated rooms with obstacle courses and duelling rooms.
Trading
| Requirement | Mastery Rank 2, plus two factor authentication on your account |
| Daily limit | One trade per Mastery Rank, reset daily |
| Where | A Dojo trading post, or Maroo's Bazaar on Mars |
| Cost | A Credit fee that scales with what is being traded |
Commonly traded: Prime parts, Rivens, rare and Corrupted Mods, Ayatan Sculptures and Arcanes. Warframe blueprints bought from the Market and most quest rewards cannot be traded.
Squad Etiquette
Resources, Credits and Mods picked up by any squad member are shared with everyone, so picking up loot never takes it from anyone. Reward selection at the end of a Void Fissure is the exception: everyone chooses independently. The rest is covered in Common Mistakes.
Q1. What do you need before you can Trade with another player?
Q2. What is the main reason to join a Clan early?
Common Mistakes
The traps that cost new players the most, and squad etiquette.
Most of these cost you time rather than anything permanent, but a few are genuinely hard to undo. They are collected from the wiki's New Player Guide, which keeps its own list for the same reason.
Hard to Undo
- ◆Never discard free quest or event rewards. Several include Orokin Catalysts and Reactors, which are among the most valuable items in the early game.
- ◆Do not finish a Kuva Larvling after The War Within until you have eight Requiem Mods and actually want a Lich. Killing one starts a system that is a nuisance to escape unprepared.
- ◆Sands of Inaros plays once. On the second tomb visit, scan every Kavat you can for Genetic Codes. It is the best source in the game, and the quest does not repeat.
Costly Habits
- ◆Keep a maxed Vacuum or Fetch on your Companion. Worth doing from the Venus Junction onward. Without it you walk over half your loot.
- ◆Spend your first 50 Platinum on slots, not on rushing builds or buying a Warframe. Covered in Foundry & Currencies.
- ◆Check a price reference before trading. warframe.market is the community standard and is not affiliated with Digital Extremes. This site's Market hub pulls the same data.
- ◆Extract with the host in Duviri and Railjack. A host migration part way through those missions can lose your run.
Squad Etiquette
- ◆In fast missions, do the objective first and loot second. Everyone is waiting on the objective, not on your containers.
- ◆Do not force start a countdown without asking. Someone is usually still modding.
- ◆In Survival, stay grouped. Enemy spawns follow the squad, and spreading out starves the life support.
- ◆Wait for your squad before taking an elevator or triggering a one way transition.
- ◆Be careful with Limbo. His Rift can stop teammates interacting with objectives if you are not deliberate about it.
- ◆Mark rare containers and resources with the waypoint key. It is always welcome.
The Big Picture
How the engine layers damage calculations.
Every weapon deals base damage split across one or more damage types. Mods, Arcanes, Rivens and Incarnon Evolutions build on those base values through a layered calculation:
The order of those layers is the single most useful thing to understand. Bonuses within a layer add together. Bonuses in different layers multiply. That is why a second damage mod is worth much less than your first multishot mod, and it is the idea the rest of this guide keeps returning to.
From that per shot figure the calculator derives Average Hit, Burst DPS and Sustained DPS, the last of which accounts for magazine size and reload time.
Q1. Which order does the engine apply these in?
Physical Damage (IPS)
Impact, Puncture, and Slash.
The three physical damage types, collectively called IPS, are the backbone of most weapons. Every one of them has a Status Effect worth knowing.
Staggers the target, briefly interrupting its action. Each proc raises the Parazon Mercy Kill threshold on heavy units by 8%, up to a maximum threshold of 80% of total Health.
The target's attacks deal 40% less damage on the first proc, and 10% less per subsequent proc, up to 80% at 5 stacks. Your weapons also gain 5% flat Critical Chance against the target per proc, up to 25% at 5 stacks.
Deals 35% of the weapon's base damage per tick over 6 seconds. This damage bypasses Armor. It does not bypass Shields; Toxin is the status that does that.
How Physical Mods Work
Physical mods such as Buzz Kill for Slash are additive with the base damage of that type only, not with the weapon's total:
A +120% Slash mod therefore adds 120% of the weapon's base Slash value, not of its total damage. This is the key difference from elemental mods, which calculate their bonus from the total. It is why physical mods are usually weaker per slot than a base damage mod such as Serration.
Q1. What does a Slash proc bypass?
Q2. How much flat Critical Chance do your weapons gain against a target at 5 Puncture stacks?
Elemental Damage
Heat, Cold, Electricity, and Toxin.
There are four base elements you can add to any weapon with mods:
| Heat | Deals 50% of base damage per tick over 6 seconds, causes the target to panic for 4 seconds, and gradually strips up to 50% of the target's Armor. |
| Cold | Reduces Movement Speed, Fire Rate and Attack Speed by 50% on the first proc and by a further 5% per proc, reaching 90% at 9 stacks. The target also takes +0.1x Critical Damage at 1 stack and +0.05x per subsequent stack, reaching +0.50x at 9 stacks. At 10 stacks the target is Frozen for 3 seconds and the Critical Damage bonus doubles to +1.0x. |
| Electricity | Deals 50% of base damage per tick to the target and to enemies within 3 metres, and stuns the affected target for 3 seconds. |
| Toxin | Deals 50% of base damage per tick over 6 seconds. Toxin damage bypasses Shields and strikes Health directly. |
Elemental mods add damage as a percentage of your total base damage, calculated after damage mods such as Serration:
Because the bonus is drawn from the total, elemental mods effectively act as another multiplier on everything your damage mods already did. That is what makes them so much stronger per slot than physical mods.
Which Damage over Time Scales with Mods
Six statuses deal damage over time: Slash, Electricity, Heat, Toxin, Gas and Blast. Only three of them have that damage increased by modding their element.
| Electricity, Heat, Toxin | Damage over time scales with your elemental mods | Elementalist mods add a further 90% |
| Slash, Gas, Blast | Damage over time does not scale with mods for that type |
Q1. Which base elemental status effects have their damage over time increased by modding that element?
Q2. What does a Heat proc do besides dealing damage over time?
Combined Elements
Mixing elements, and why mod order matters.
Two base elements combine into a combined element, and the order of your mod slots decides what combines with what.
| Heat + Cold | Blast | Delayed detonations that erupt at maximum stacks. |
| Heat + Electricity | Radiation | Turns the target against its allies. |
| Heat + Toxin | Gas | An expanding cloud that damages everything inside it. |
| Cold + Electricity | Magnetic | Amplifies damage to Shields and Overguard. |
| Cold + Toxin | Viral | Amplifies all damage dealt to Health. |
| Electricity + Toxin | Corrosive | Strips Armor while the status is active. |
Interactive Elemental Combiner
Pick any two base elements to see what they produce and which factions it beats:
Elemental Combiner
Select two base elements to see what they combine into
Slot 1
Damage over time, panic, and a gradual Armor strip.
Slot 2
Slows the target and grants bonus Critical Damage against it.
Heat+ Cold→
Cold→ Blast
BlastDelayed detonations that erupt at maximum stacks.
Best vs: Infested Deimos
All Combined Elements
Delayed detonations that erupt at maximum stacks.
▸ Infested Deimos
Turns the target against its allies.
▸ Sentient, The Murmur
An expanding cloud that damages everything inside it.
▸ Infested Deimos, Techrot
Amplifies damage to Shields and Overguard.
▸ Corpus, Corpus Amalgam, Techrot
Amplifies all damage dealt to Health.
▸ Orokin
Strips Armor while the status is active.
▸ Grineer, Kuva Grineer, Scaldra
The Combination Algorithm
- ◆Walk the mods in slot order, 0 to 9.
- ◆Collect each elemental stat bonus as you go.
- ◆A base element enters a pending slot. If the next base element can combine with the pending one, they merge. Otherwise the pending element is finalised and the new one takes its place.
- ◆Mods that already grant a combined element, such as a Blast mod, pass straight through without combining.
The General Purpose Combination: Viral and Heat
For most content Viral and Heat is the strongest pairing available to a new player:
- ◆Viral multiplies damage dealt to Health, from +100% at one stack to +325% at ten.
- ◆Heat applies damage over time, panics the target, and gradually strips up to 50% of its Armor.
- ◆Heat's damage over time is itself multiplied by Viral, because it is damage dealt to Health.
To build it, slot Cold, then Toxin, then Heat, in that order.
Q1. You slot Heat, then Cold, then Toxin. What do you get?
Q2. Which two elements combine into Corrosive?
How Mods Scale Damage
Additive within a category, multiplicative across them.
This is the section that decides whether your builds are good. Mod bonuses are applied in layers, and the rule that matters is simple: same category adds, different categories multiply.
Try It
Toggle these mods and watch the multiplier chain. Notice how adding a second damage mod moves only the first factor, while adding a multishot or critical mod introduces an entirely new one.
1. Base Damage Mods
Serration, Hornet Strike and Pressure Point affect every damage type proportionally. A maxed Serration at +165% makes each point of base damage worth 2.65 times as much. A second +165% damage mod does not double that to 5.30, it adds into the same bracket for 4.30.
2. Elemental and Physical Mods
Added on top of the scaled base, as described in the previous two sections. Elemental percentages of the same element add together, and the result is calculated from the weapon's total damage.
3. Multishot Mods
Every extra projectile carries full damage and rolls its own critical hit and status independently. Split Chamber at +90% means 1.9 effective shots per trigger pull, and it multiplies with everything above it.
4. Critical Mods
Covered in the next section.
5. Fire Rate and Attack Speed
The Stacking Rule
| Two damage mods | Additive | +165% and +165% gives 4.30x, not 7.02x |
| Damage mod and multishot mod | Multiplicative | 2.65x and 1.9x gives 5.03x |
| Two mods for the same element | Additive | Two +90% Heat mods give +180% Heat |
| Elemental and critical mods | Multiplicative | Separate layers |
Q1. You already have Serration at +165%. Which addition increases your damage more?
Q2. How do two +90% Heat mods on the same weapon combine?
Critical Hits
Crit tiers and multiplier mechanics.
Critical Chance above 100% does not go to waste. Each full 100% guarantees a higher critical tier, and the remainder is the chance to reach the next one up.
Crit Tiers
| 0% | No critical hits | White |
| 1% to 99% | Tier 1 | Yellow |
| 100% to 199% | Tier 2, every hit crits | Orange |
| 200% and above | Tier 3 | Red |
The Crit Formula
This handles multi tier crits without needing a special case. For example:
- ◆250% Critical Chance with a 2.5x Critical Multiplier gives 1 + 2.5 x (2.5 - 1) = 4.75x average damage.
- ◆At 250% Critical Chance every hit is at least an orange crit, and half of all hits are red crits.
How Crit Chance Scales
Mods such as Point Strike at +150% multiply the weapon's base value, so they do far more for a weapon that already crits often than for one that does not. Warframe abilities like Harrow's Covenant add flat Critical Chance on top, which is what makes them able to lift a low crit weapon.
Q1. A weapon has 250% Critical Chance. What does that mean?
Status Effects (Procs)
All fifteen statuses, their stacks and durations.
Status Chance is the probability that a hit applies a Status Effect, also called a proc. Each damage type has its own.
Proc Weighting
When a hit procs, which damage type triggers is weighted by the damage split. A weapon dealing 60% Slash, 20% Heat and 20% Viral procs Slash three times as often as either of the others. Adding a large elemental bonus therefore shifts not just your damage but which statuses you actually apply.
Every Status Effect
Select any status to see its exact magnitude, duration and stack cap, and drag the slider to watch it scale.
ViralVirusIncreases damage dealt to Health by 100% on the first stack and by 25% per subsequent stack, reaching 325% at 10 stacks. It does not reduce the target's maximum Health.
Viral has not halved maximum Health since Update 27.2. It now multiplies incoming Health damage, which includes damage over time.
Status Priming
Priming means deliberately applying a status to weaken a target before your damage lands. Four are worth knowing:
| Viral | Multiplies damage to Health, up to +325% at 10 stacks | The default choice |
| Magnetic | Multiplies damage to Shields and Overguard, up to +325% at 10 stacks | Rarely on your main weapon |
| Corrosive | Strips Armor, up to 80% at 10 stacks | Expires after 8 seconds |
| Cold | Slows, and grants bonus Critical Damage against the target | Less common, but hard crowd control |
Q1. What does Viral actually do?
Q2. How much Armor does Corrosive strip, and for how long?
Q3. What does a Blast proc do?
Q4. Radiation makes a target attack its allies. How much extra damage does it deal at 10 stacks?
Multishot & DPS
Multishot rules, Burst vs Sustained DPS.
Multishot
Multishot is among the strongest multipliers available because each extra projectile carries full damage and rolls its own critical hit and status independently.
A +90% multishot mod multiplies your output by 1.9 for a single slot.
Burst DPS
What you deal while the trigger is held, ignoring reloads:
Sustained DPS
The number that matters in a real fight, because it includes the reload:
Weapons with large magazines and quick reloads have a Sustained DPS close to their Burst DPS. Snipers and bows lose considerably more.
Charge Weapons
Q1. What is the difference between Burst DPS and Sustained DPS?
Enemy Defenses
Armor, Shields, Overguard, and faction weaknesses.
Enemies have four defensive layers:
| Health | Base hit points. Every enemy has this. |
| Armor | Reduces incoming damage on a curve that flattens at the 2,700 cap. The Grineer speciality. |
| Shields | Depleted before Health takes damage, though Toxin bypasses them. The Corpus speciality. |
| Overguard | An extra layer on Eximus units, broken before Health or Shields. |
Armor Damage Reduction
| Enemy, Armor at or below 2,700 | Damage Reduction = 90% x sqrt(Armor / 2700) |
| Enemy, Armor above 2,700 | Damage Reduction = Armor / (Armor + 300) |
| Tenno (your Warframe) | Damage Reduction = Armor / (Armor + 300) |
Level scaling clamps enemy Armor between 200 and the 2,700 cap. Drag the sliders below to see what that means in practice, and what stripping Armor is worth.
Sample weapon: 1,000 damage per shot at 4 shots per second, with no faction bonus applied.
Faction Weaknesses
The three factions you meet first:
Impactx1.5 damageCorrosivex1.5 damagePuncturex1.5 damageMagneticx1.5 damageSlashx1.5 damageHeatx1.5 damageLater Factions
You will not meet most of these until well into the story, but the table is here:
Impactx1.5 damageCorrosivex1.5 damage Electricityx1.5 damageMagneticx1.5 damageBlastx1.5 damage
 Gasx1.5 damageColdx1.5 damage
 Radiationx1.5 damageSlashx1.5 damage
 Toxinx1.5 damageElectricityx1.5 damageRadiationx1.5 damageImpactx1.5 damageCorrosivex1.5 damageGasx1.5 damageMagneticx1.5 damageImpactx1.5 damageElectricityx1.5 damage
 Voidx1.5 damage
Overguard
The Steel Path
| Enemy Level | +100 | |
| Enemy Health | 250% of normal | |
| Enemy Shields | 250% of normal | |
| Enemy Armor | Unchanged | The Armor multiplier was removed in Update 36 |
Damage Attenuation
Bosses and certain special enemies use damage attenuation, a diminishing returns mechanic that soft caps how much a single hit can take off. Against those targets, consistent moderate damage outperforms one enormous hit.
Q1. Which formula gives an enemy's damage reduction from Armor?
Q2. Post Update 36, what determines whether a damage type is strong against an enemy?
Q3. Does Overguard make an enemy immune to Status Effects?
Q4. What does The Steel Path do to enemies?
Mod Capacity & Polarities
Capacity budget, drain, Forma, and aura slots.
Every mod costs capacity, also called drain. Your budget equals the item's rank, to a maximum of 30, and an Orokin Reactor (Warframes) or Orokin Catalyst (weapons) doubles it.
Capacity Budget
| Rank 30, no Reactor or Catalyst | 30 capacity |
| Rank 30, with Reactor or Catalyst | 60 capacity |
| Kuva, Tenet and Coda weapons | 30 plus 2 per Forma, doubled by a Catalyst |
Polarity Matching
Drain is adjusted per slot by the polarity you put the mod in:
| Matching polarity | ceil(drain / 2) | Half cost, rounded up |
| No polarity | Full drain | |
| Mismatched polarity | floor(drain x 1.25) | 25% penalty |
| Universal (Omni Forma) | ceil(drain / 2) | Matches everything |
Aura and Stance Slots
Aura and Stance mods add capacity instead of consuming it, and a matching polarity doubles what they give:
| Matching polarity | bonus x 2 |
| No polarity | bonus x 1 |
| Mismatched polarity | floor(bonus x 0.8) |
Interactive Mod Simulator
Click mods to equip them and watch the capacity bar. The eight mods below total 83 drain against a budget of 60, so you cannot have them all. Choosing is the exercise.
Mod Simulator
Excalibur · Rank 30 · Orokin Reactor · Click a mod to equip
Available Mods. Click to equip or unequip.
Excalibur
Rank 30 · Max Stats
Live Stats
Q1. A mod costs 9 drain. What does it cost in a slot with a matching polarity?
Q2. What is the maximum Mod Capacity on a rank 30 Warframe with an Orokin Reactor?
Advanced Mechanics
Incarnon, Valence, Rivens, and buffs.
Incarnon Evolutions
Incarnon weapons have an alternate firing mode with its own stats:
- ◆Base Incarnon stats are always active while the adapter is installed.
- ◆Evolution perks apply only when you have selected them.
- ◆Perks can add flat elemental damage, Critical Chance, Status Chance and more, on top of your mods.
Valence Bonuses on Kuva, Tenet and Coda Weapons
Lich and Sister weapons carry an innate elemental bonus:
The element is decided by the Lich or Sister that generated the weapon, not by the weapon itself, and it can be transferred between two copies of the same weapon. It is added as elemental damage and will combine with your mod elements, so a Valence element can quietly ruin an intended combination.
Self Enhancing Set Mods
The Umbral set bonus increases each equipped Umbral mod's own stat, rather than granting a separate bonus:
| Umbral Intensify | +44% Ability Strength at max rank | Own stat +25% with 2 pieces, +75% with 3 |
| Umbral Vitality | +100% Health at max rank | Own stat +30% with 2 pieces, +80% with 3 |
| Umbral Fiber | +100% Armor at max rank | Own stat +30% with 2 pieces, +80% with 3 |
Each also grants +11% Tau Resistance. All three cost 16 drain at max rank, which is why a full Umbral build usually needs several Forma.
Rivens
Riven mods roll randomised stats scaled by the weapon's disposition:
Disposition is set per weapon and moves with how much the community uses it. Popular weapons have low dispositions and weak Rivens; rarely used weapons roll much larger numbers. Rivens are a late consideration, well after your first Forma.
Conditional and Galvanized Mods
- ◆Galvanized mods, such as Galvanized Chamber, gain stacks on kill, with each stack adding multishot or damage.
- ◆Weapon Arcanes, such as Primary Merciless, build stacks over the course of a fight.
- ◆The melee combo multiplier rises with consecutive hits.
These make a build look far stronger on paper than it is on the first shot. The calculator lets you set the stack count so you can compare a realistic mid fight number against the theoretical maximum.
External Buffs
Warframe ability buffs apply as their own multiplicative layer, which is what makes them so strong. Rhino's Roar is the clearest example at +50% at max rank before Ability Strength is taken into account.
Q1. How does a Riven Mod's disposition affect it?
Q2. With all three Umbral mods equipped, how much is each mod's own stat increased?
Game Settings
Keybinds, accessibility and display options worth changing early.
Warframe ships with defaults that suit nobody in particular. These are the settings worth changing early, taken from the wiki's New Player Guide. None of them are required, and none affect balance.
Keybinds
| Sprint and Roll | Bind to separate keys | Sharing one key makes bullet jump chaining awkward |
| Heavy Attack | Often rebound to 6 | The default is uncomfortable to hold mid combat |
| Toggle Crouch | Usually not worth it | Crouching is momentary, and opening chat cancels it |
| Ability tap or hold | Configurable per Warframe | Or globally, if you prefer one behaviour |
| Fixed binds | F6 screenshot, Y Cipher | Cannot be removed, but can be overridden |
Accessibility
These are filed under Accessibility but several are simply more comfortable for everyone:
- ◆Turn off Hold to Sprint so one press keeps you sprinting.
- ◆Set semi automatic and burst weapons to behave as full automatic, which saves a great deal of clicking.
- ◆Set quick time events to Hold rather than repeated presses.
- ◆Turn off screen shake. It is the single most common setting people change.
- ◆Turn on enemy and ally highlighting, which helps a lot in crowded rooms.
Display and Audio
- ◆Motion Blur, Depth of Field and Film Grain are all optional and commonly turned off.
- ◆The FPS display also shows your ping and memory use, which is useful when diagnosing a bad squad.
- ◆Turn on chat message timestamps so you do not reply to an hour old message.
- ◆Ally Mandachord volume is separate from your own, so you can mute other people's Octavia music without muting yours.
Matchmaking
| Region | Sets your regional chat and who you match with | |
| Ping limit | Stops you joining squads hosted too far away | |
| Language | Changed in the launcher, not in game | Does not affect matchmaking |
Cheat Sheet
The whole guide condensed to one screen.
Everything in this guide, compressed. Verified against Update 43: Jade Shadows: Constellations.
Capacity and Polarity
| Capacity | Equals the item's rank, maximum 30 |
| Orokin Reactor / Catalyst | Doubles capacity to 60 |
| Matching polarity | ceil(drain / 2) |
| Mismatched polarity | floor(drain x 1.25) |
| Forma | Adds or changes a polarity, resets the item to rank 0 |
| Aura and Stance slots | Add capacity. Matching polarity doubles the bonus. |
The Stacking Rule
The categories, in the order the calculation applies them:
- ◆Base Damage (Serration, Hornet Strike, Pressure Point)
- ◆Elemental damage, calculated from the weapon's total damage
- ◆Multishot (Split Chamber, Barrel Diffusion)
- ◆Critical Chance and Critical Damage
- ◆Fire Rate or Attack Speed
Physical mods are the exception: they add a percentage of that damage type's base value only, not of the weapon's total, which is why they are usually the weakest slot for slot.
Every Status at a Glance
| Status | Effect | Stacks | Duration | DoT |
|---|---|---|---|---|
| Impact | Staggers the target and raises its Parazon Mercy threshold. | 5 | 6s | No |
| Puncture | Weakens the target's attacks and grants flat Critical Chance against it. | 5 | 10s | No |
| Slash | Damage over time that bypasses Armor. | No cap | 6s | Yes |
| Heat | Damage over time, panic, and a gradual Armor strip. | No cap | 6s | Yes, scales |
| Cold | Slows the target and grants bonus Critical Damage against it. | 10 | 6s | No |
| Electricity | Chaining damage over time that stuns. | No cap | 6s | Yes, scales |
| Toxin | Damage over time that bypasses Shields. | No cap | 6s | Yes, scales |
| Blast | Delayed detonations that erupt at maximum stacks. | 10 | 1.5s | Yes |
| Corrosive | Strips Armor while the status is active. | 10 | 8s | No |
| Gas | An expanding cloud that damages everything inside it. | 10 | 6s | Yes |
| Magnetic | Amplifies damage to Shields and Overguard. | 10 | 6s | No |
| Radiation | Turns the target against its allies. | 10 | 12s | No |
| Viral | Amplifies all damage dealt to Health. | 10 | 6s | No |
| Void | Pulls incoming projectiles toward the target. | No cap | 3s | No |
| Tau | Raises the target's vulnerability to further status. | 10 | 8s | No |
Damage over Time
| Deal damage over time | Slash, Electricity, Heat, Toxin, Gas, Blast |
| Scale with modding that element | Electricity, Heat, Toxin only |
| Elementalist mods | Increase Status damage over time by a further 90% |
| Faction Damage mods | Applied twice: once to the hit, once to the Status damage |
Status Priming
| Viral | Multiplies damage to Health, +325% at 10 stacks |
| Magnetic | Multiplies damage to Shields and Overguard, +325% at 10 stacks |
| Corrosive | Strips Armor, 80% at 10 stacks, for 8 seconds |
| Cold | Slows and grants bonus Critical Damage. Freezes at 10 stacks. |
Enemy Defences
| Enemy Armor DR | 90% x sqrt(Armor / 2700), below the 2,700 cap |
| Tenno Armor DR | Armor / (Armor + 300) |
| Faction vulnerability | x1.5 incoming damage |
| Faction resistance | x0.5 incoming damage |
| Grineer | Weak to Impact and Corrosive |
| Corpus | Weak to Puncture and Magnetic |
| Infested | Weak to Slash and Heat |
| The Steel Path | Level +100, Health and Shields at 250%, Armor unchanged |
Printable Cheat Sheets
Community made reference sheets, reproduced here with the original PDFs for printing. The live version above stays in sync with the rest of the guide; these are snapshots.
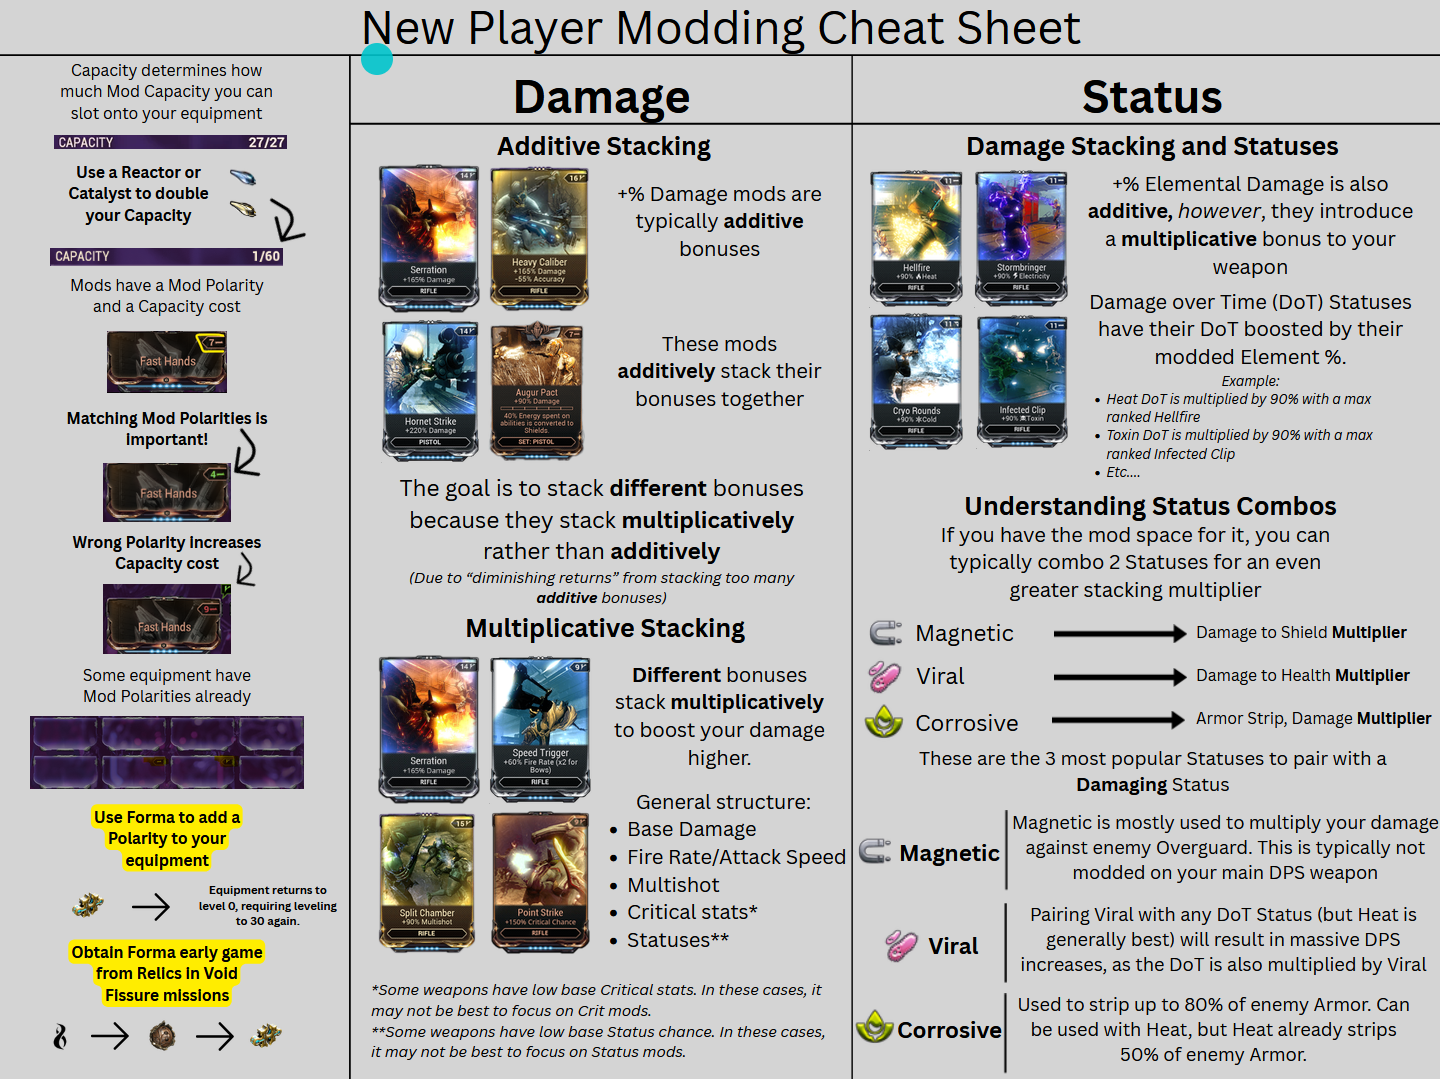
Capacity and polarities, additive versus multiplicative stacking, and the three priming statuses. The same ground as the Stacking Rule above, laid out visually.
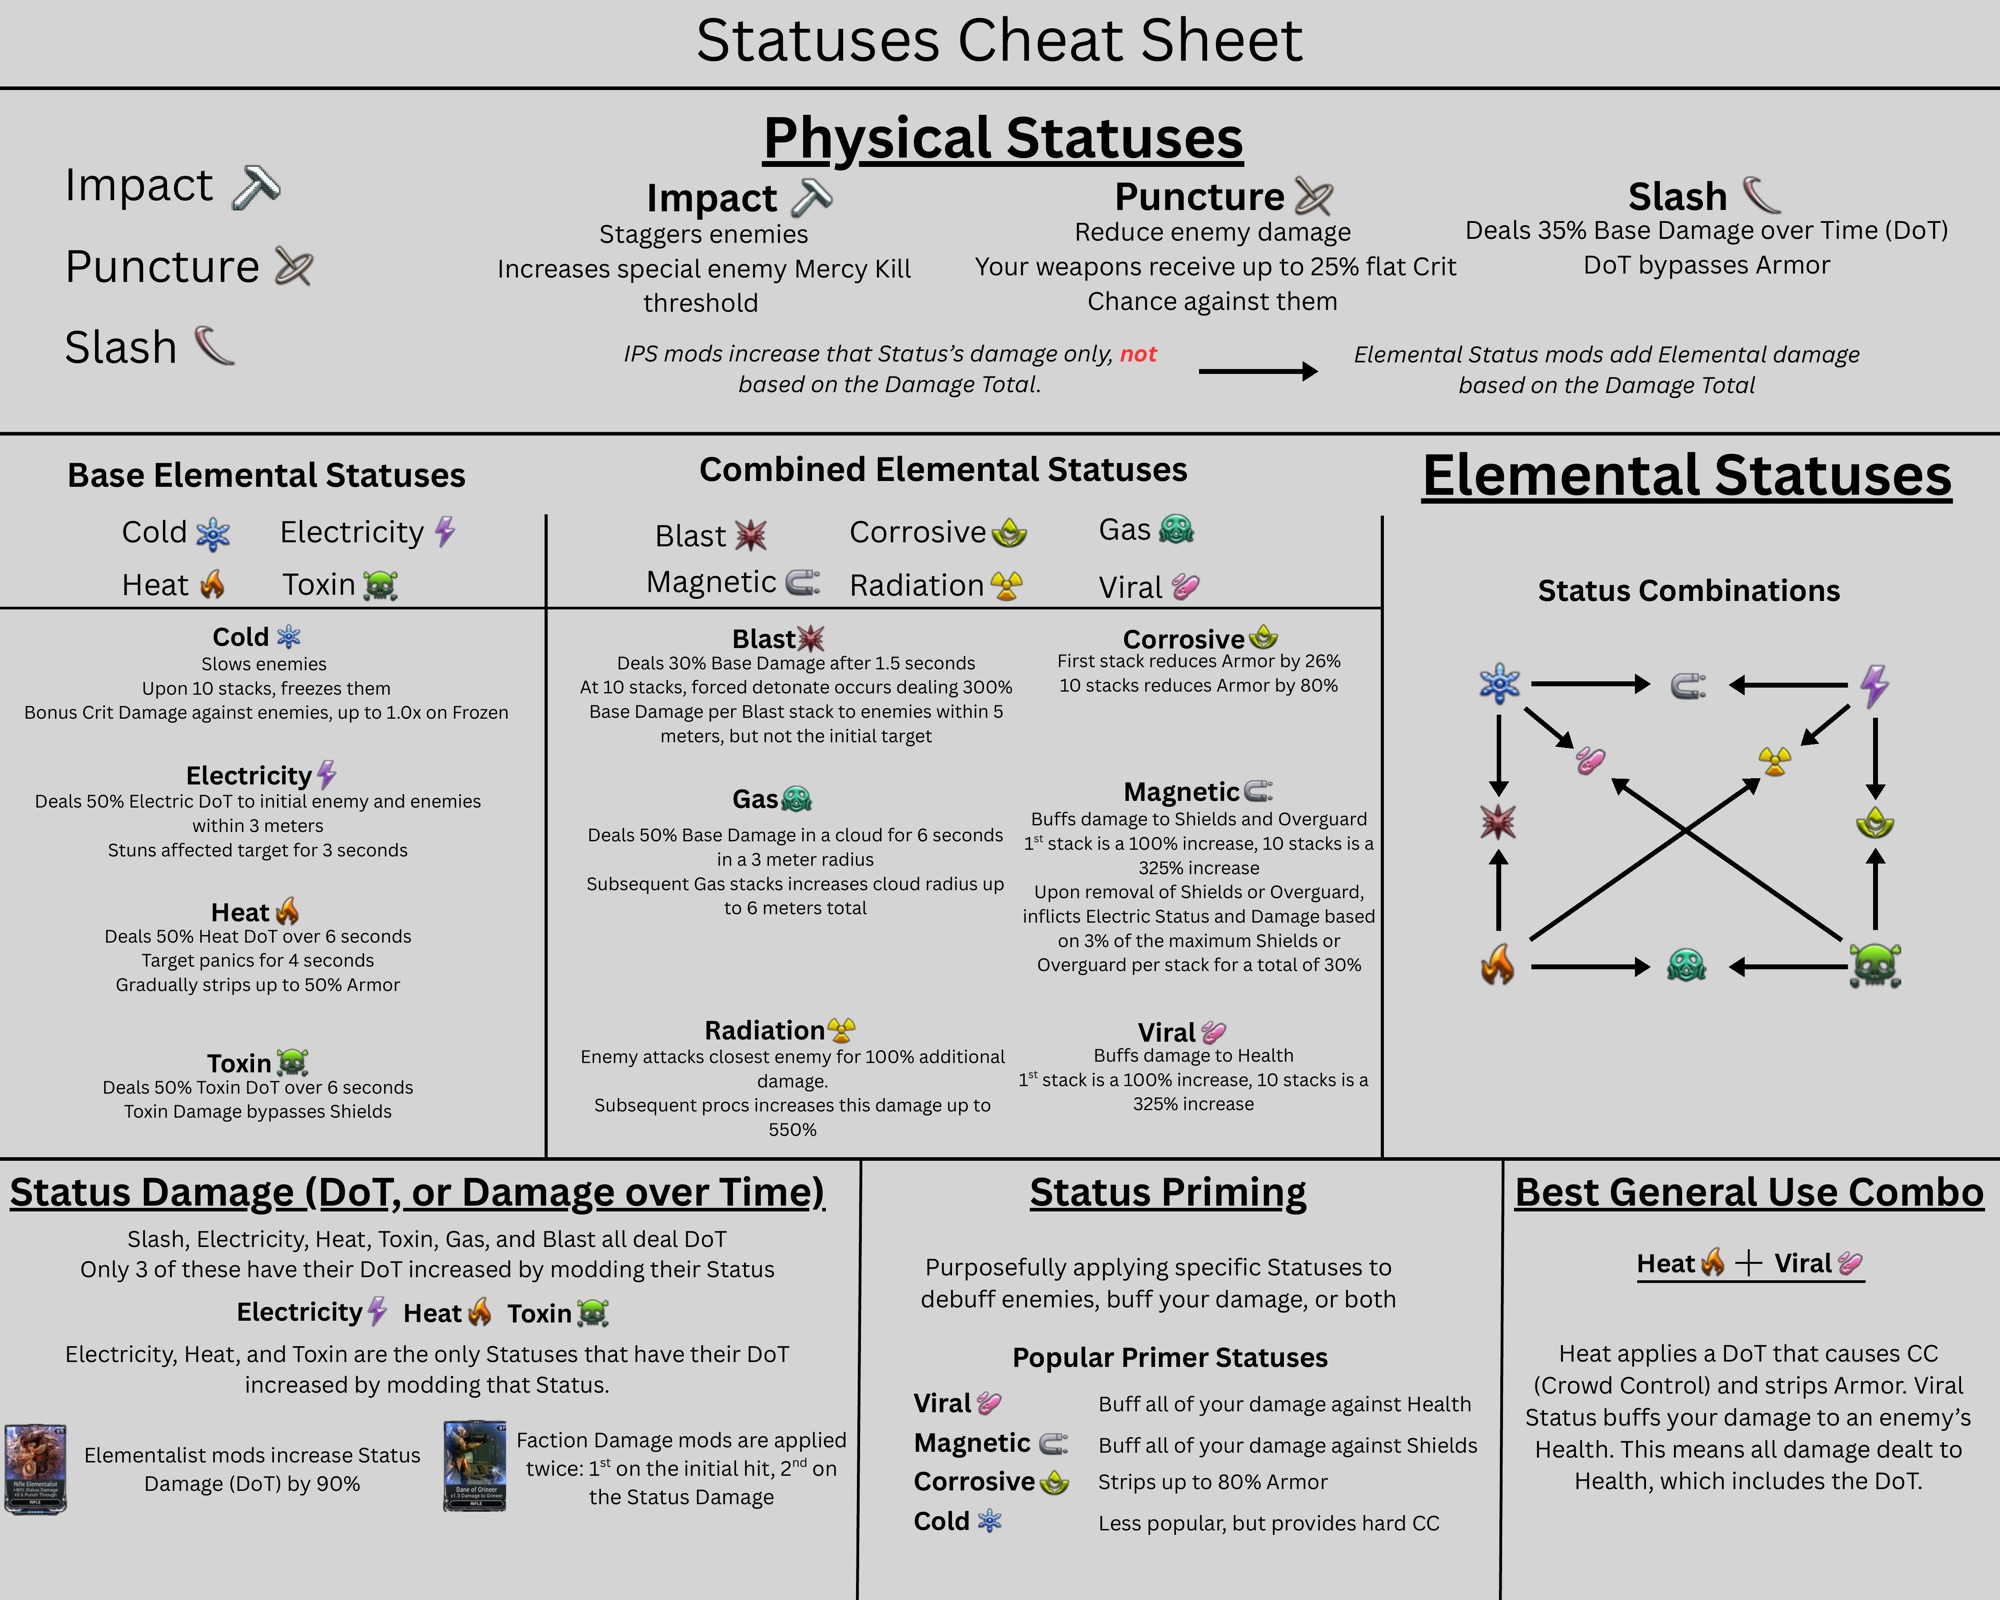
Every Status Effect, what it does, and the popular priming combinations.
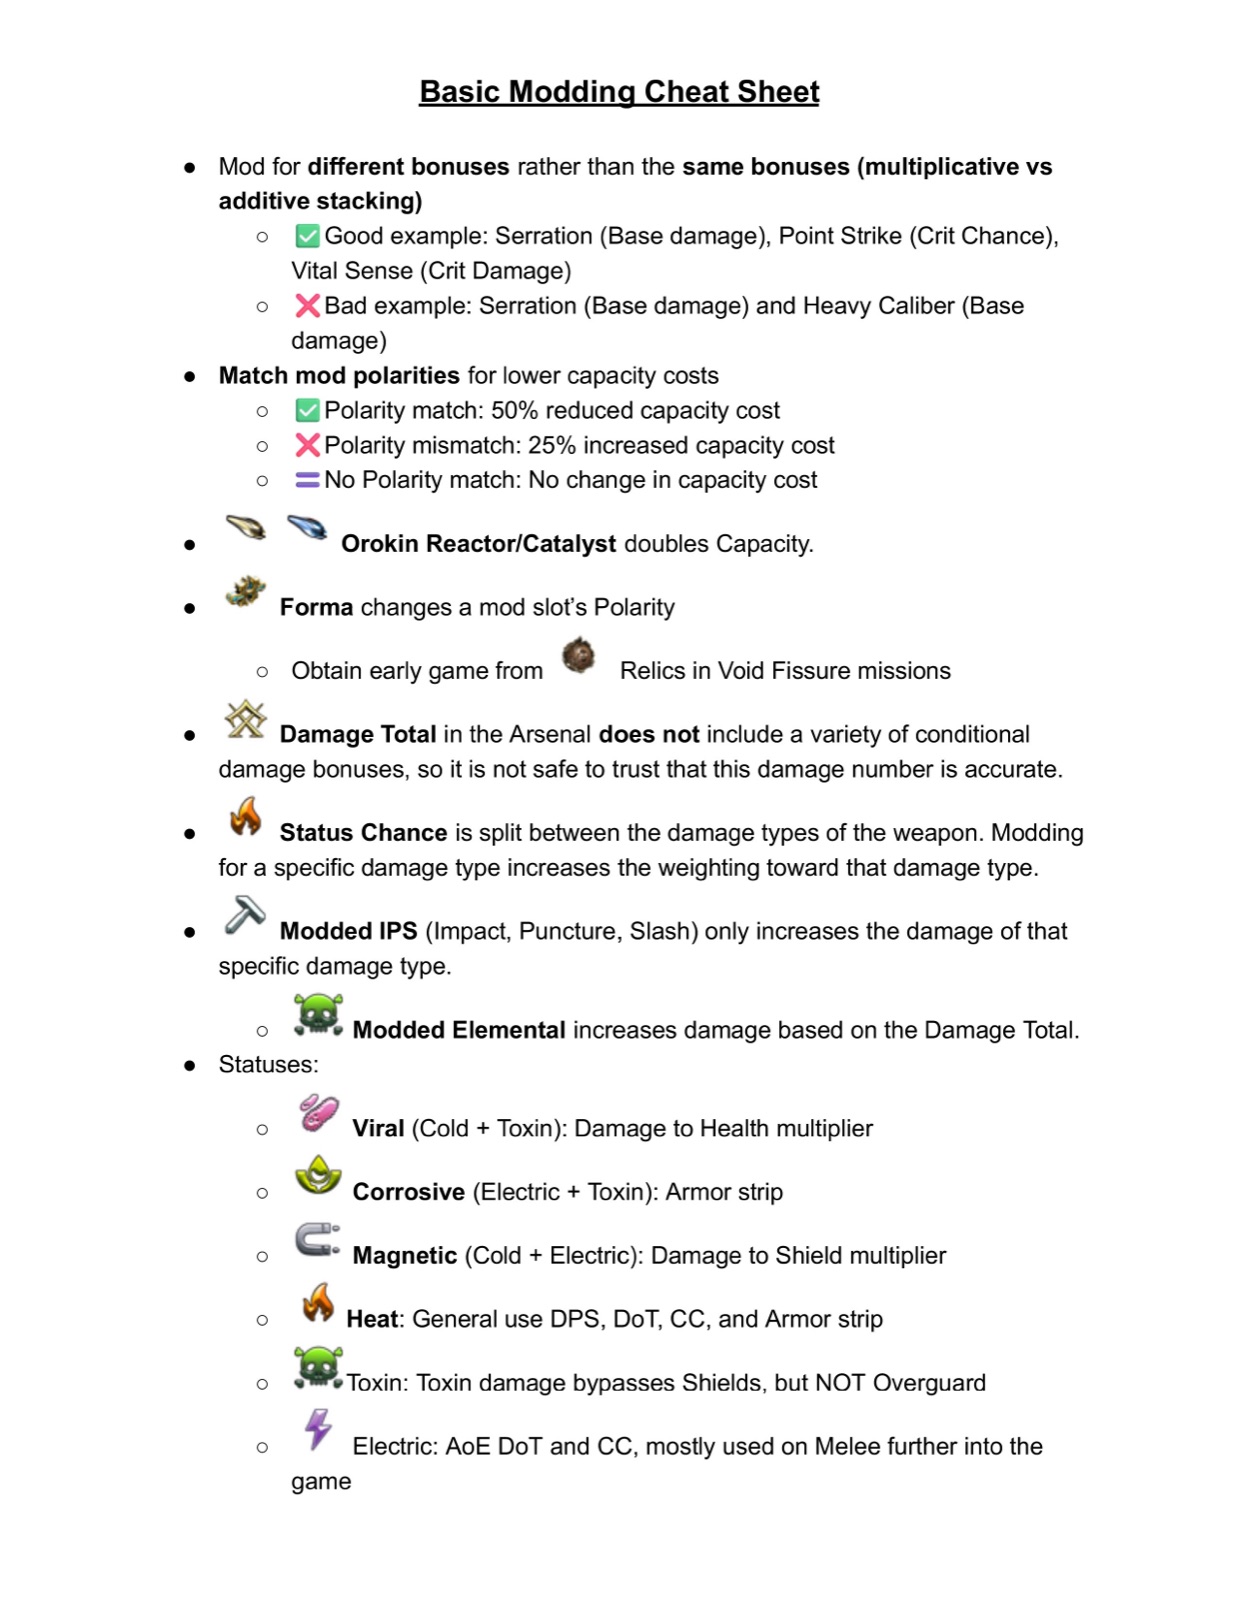
Page 1 of 3. Stacking, polarities, capacity and the status summary.
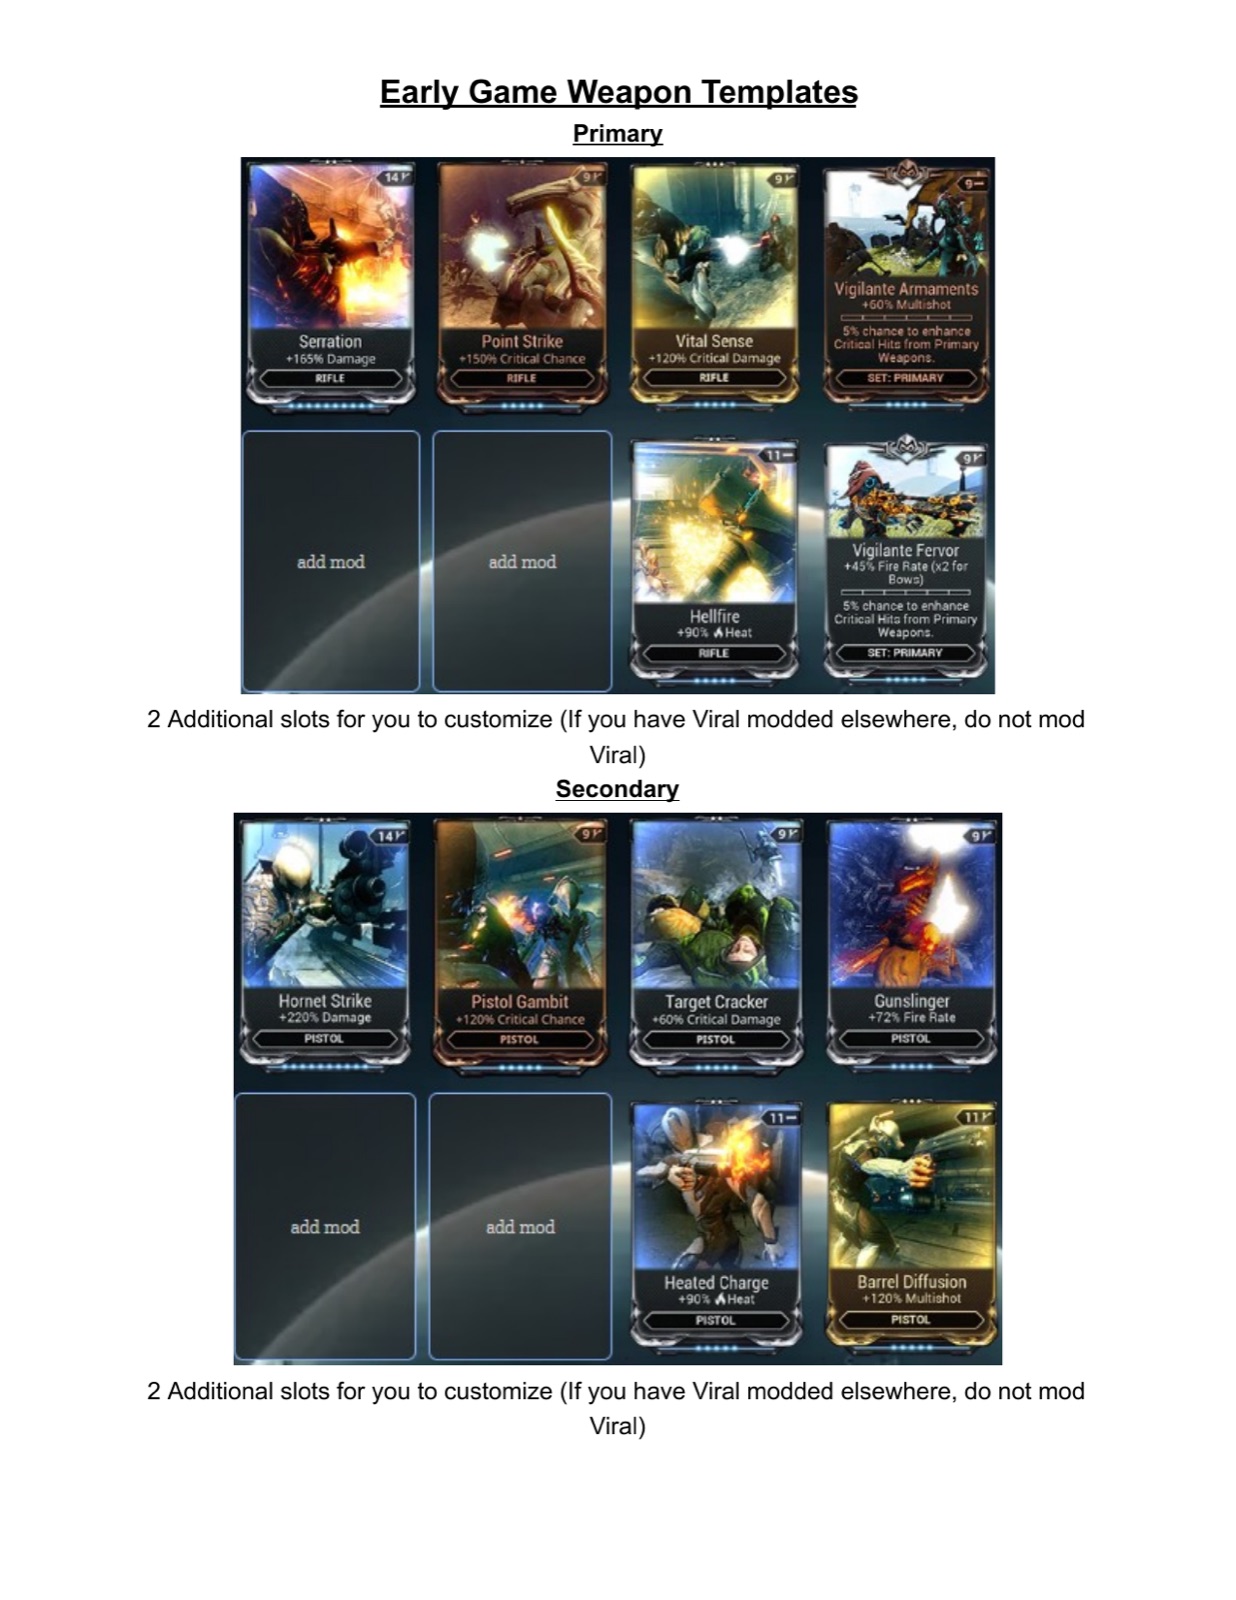
Page 2 of 3. Primary and secondary starting templates.
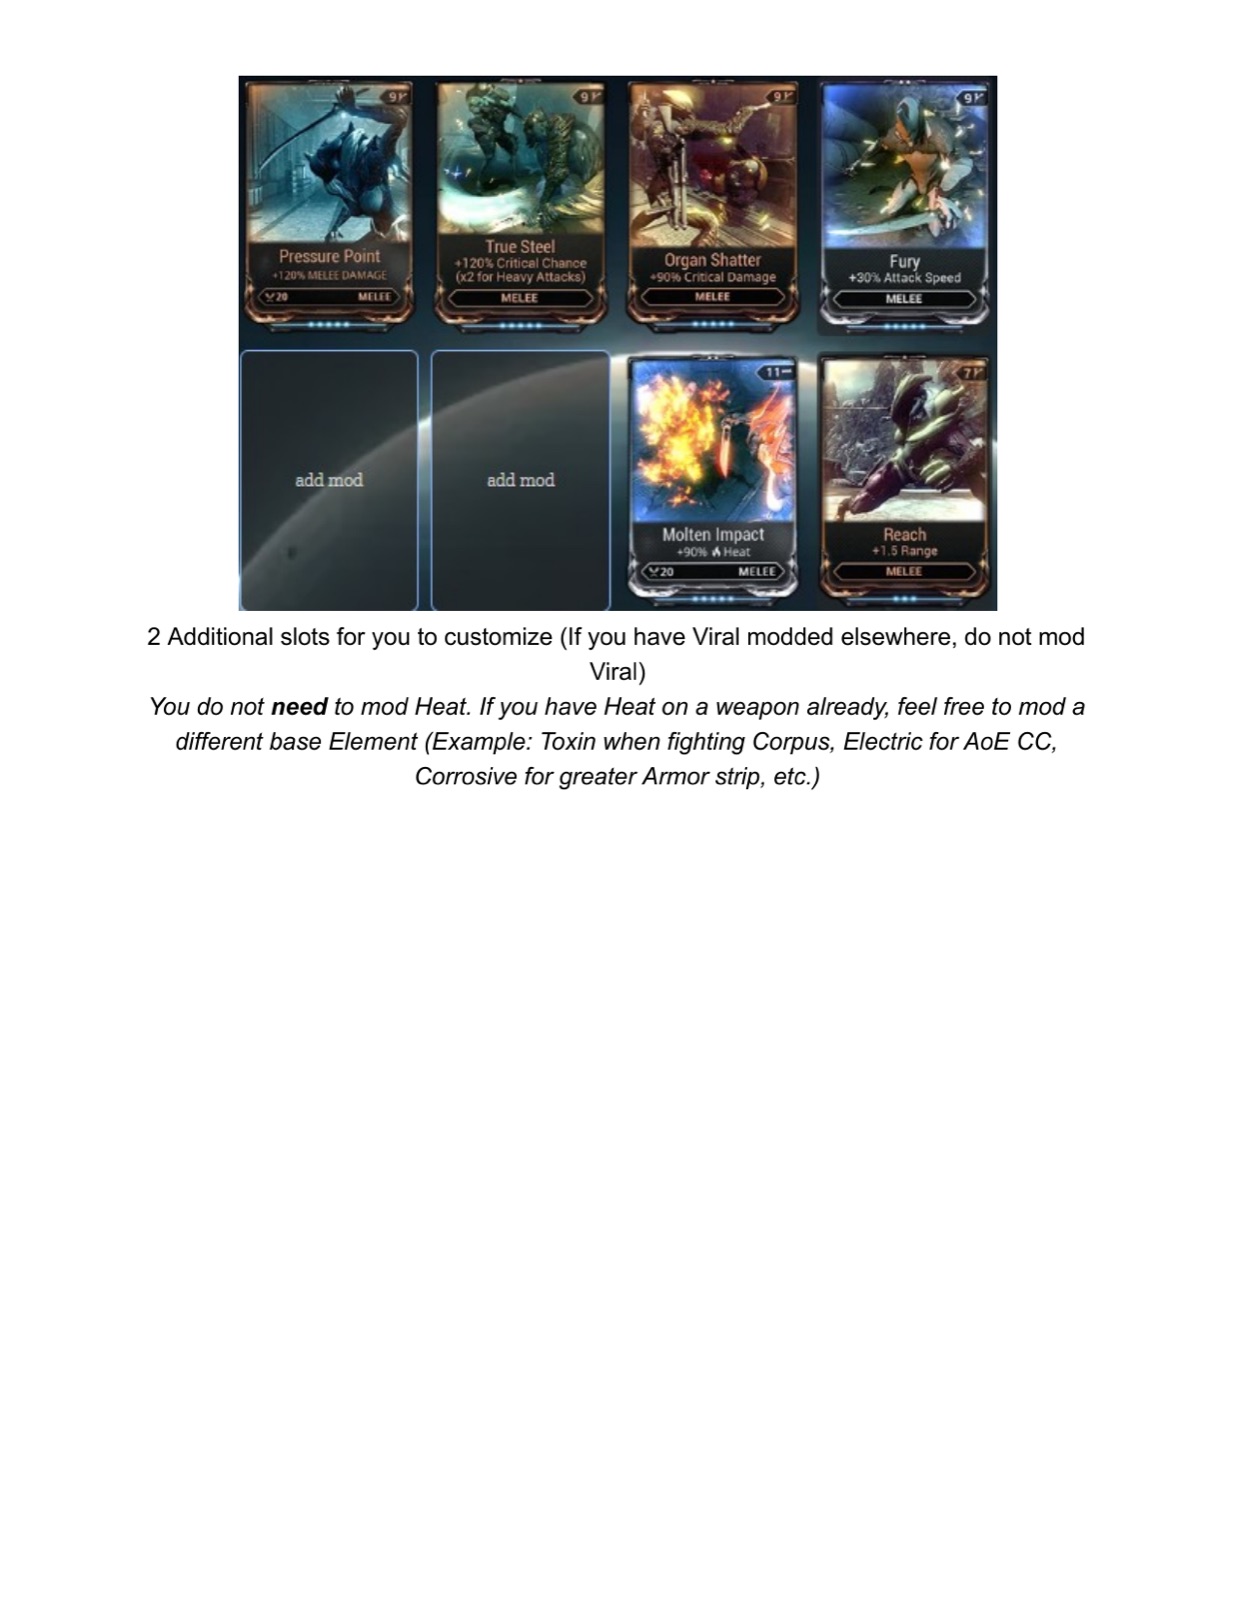
Page 3 of 3. Melee template.
Modding Priority
- ◆Base damage mod first. Serration, Hornet Strike or Pressure Point.
- ◆Multishot next. It multiplies with the damage mod.
- ◆Two elemental mods for a combined element. Viral is the default.
- ◆Critical mods if the weapon's base Critical Chance is 20% or higher.
- ◆Status mods if the base Status Chance is 20% or higher and you want procs.
- ◆Fill what is left with more elements, fire rate or utility.
Q1. Which status pairing is the best general purpose combination?
Q2. Why is Magnetic usually not modded on your main damage weapon?
Glossary & Final Exam
Key terms, modding priority, and a scored exam.
Glossary
| DPS | Damage Per Second |
| TTK | Time To Kill, how long a specific enemy takes to die |
| IPS | Impact, Puncture and Slash, the three physical damage types |
| Proc | A triggered Status Effect |
| Priming | Applying a Status deliberately to weaken a target before damage |
| Crit Tier | How many full 100% layers of Critical Chance a weapon has |
| Multishot | Additional projectiles per trigger pull, each at full damage |
| Burst DPS | Damage per second while firing, ignoring reloads |
| Sustained DPS | Damage per second including reload downtime |
| Disposition | Per weapon multiplier on Riven stats. Higher on less used weapons. |
| Potato | An Orokin Reactor or Catalyst, which doubles Mod Capacity |
| Forma | Adds or changes a slot's polarity and resets the item to rank 0 |
| EHP | Effective Hit Points. For a Warframe, Health x (1 + Armor / 300). |
| Attenuation | Boss mechanic that soft caps damage from a single hit |
| Steel Path | Hard mode. Level +100, Health and Shields at 250%, Armor unchanged. |
| Valence | The innate element on a Kuva, Tenet or Coda weapon |
| Overguard | An extra defence layer on Eximus units that blocks crowd control |
| Junction | The gated link between two planets on the Star Chart |
| Relic | A Void Relic, the only source of Prime equipment |
| Reactant | Dropped by corrupted enemies in Void Fissures. Ten opens a Relic. |
| Ducats | Currency from selling Prime parts at a relay, spent with Baro Ki'Teer |
| Endo | The currency used to rank Mods up |
Final Exam
Ten questions drawn from across the guide. Anything you miss links back to the section it came from.
10 questions drawn at random from every section. Answer them all, then submit for a score. Retaking draws a fresh set.
Q1. Which order does the engine apply these in?
Q2. How much Armor does Corrosive strip, and for how long?
Q3. How much flat Critical Chance do your weapons gain against a target at 5 Puncture stacks?
Q4. Why is The Circuit worth running as a newer player?
Q5. What do you need before you can Trade with another player?
Q6. Radiation makes a target attack its allies. How much extra damage does it deal at 10 stacks?
Q7. What is the maximum Mod Capacity on a rank 30 Warframe with an Orokin Reactor?
Q8. You already have Serration at +165%. Which addition increases your damage more?
Q9. With all three Umbral mods equipped, how much is each mod's own stat increased?
Q10. What does a Heat proc do besides dealing damage over time?
The weapon calculator runs the same formulas described in this guide against real weapons and Mods, so you can test a build before spending Forma on it.
Verified against Update 43: Jade Shadows: Constellations, released 2026-06-17. Checked 2026-08-31 against wiki.warframe.com.